Introduction
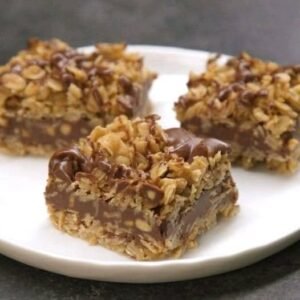
The holidays are the perfect time to indulge in decadent treats, and what better way to celebrate than with Holiday Cookie Bars? These rich, sweet, and utterly delicious bars are a fantastic option for those who want to enjoy the flavors of classic cookies but without all the hassle of individual baking. These cookie bars are easy to prepare, bake, and serve, making them the ideal treat for holiday gatherings, family get-togethers, or even as a thoughtful gift for loved ones.
The best part? These Holiday Cookie Bars can be customized to your taste. Whether you prefer a chocolatey center, a crunchy mix-in, or a little festive flair, these bars can be tailored to suit every palate. With the perfect balance of chewy and crispy, they’ll quickly become a holiday favorite in your home.
Why Holiday Cookie Bars Are a Must-Have Treat
There’s something truly magical about the holidays, and Holiday Cookie Bars perfectly embody the spirit of the season. Here’s why these treats are a must-have during the holidays:
- Less Time, More Flavor: Unlike traditional cookies that need to be scooped and baked individually, cookie bars are a one-pan wonder. Simply spread the dough in a baking pan, bake, and slice. This not only saves time but also ensures that every bite is consistent in flavor and texture.
- Perfect for Sharing: The large, sliced format makes it easier to serve a crowd. Whether you’re hosting a party, attending a potluck, or gifting them to friends and family, cookie bars are a crowd-pleasing treat.
- Customizable: Cookie bars allow you to get creative with ingredients. From adding nuts, dried fruits, or different types of chocolate, you can make these bars truly your own. Want to make them more festive? Try adding sprinkles or drizzling icing for a holiday-themed treat.
- Holiday Comfort: These bars bring comfort and warmth, especially when enjoyed with a cup of hot cocoa or eggnog. Their deliciously indulgent nature makes them the perfect companion for cozy winter nights.
What Makes These Holiday Cookie Bars Special
These Holiday Cookie Bars are special because they combine a variety of simple ingredients that result in a rich and decadent treat. Let’s break down the main components that make these bars so delicious:
Butter and Sugar – The Perfect Base
Butter is the foundation of any great cookie, and these bars are no exception. The unsalted butter gives the bars a rich, creamy texture while allowing the other ingredients to shine. Paired with both brown sugar and granulated sugar, this combination provides the perfect balance of sweetness and moisture.
Eggs and Vanilla – Binding and Flavoring
Eggs help bind the dough together, creating a chewy, soft texture that’s perfect for bars. Vanilla extract is the secret ingredient that adds depth of flavor, complementing the sweetness of the sugars and butter.
Flour and Baking Powder – Structure and Rise
The flour provides the necessary structure for the cookie bars, while baking powder ensures the bars rise slightly and have the ideal texture. This combination guarantees that the bars hold together perfectly and have just the right amount of fluffiness.
Chocolate Chips and Mix-ins – The Delicious Additions
Chocolate chips are a classic addition to these cookie bars, adding melty pockets of chocolate in every bite. However, feel free to get creative with mix-ins like nuts (walnuts, almonds, or pecans) or dried fruit (cranberries or raisins). These add texture and additional layers of flavor to the bars.
Step-by-Step Instructions for Decadent Holiday Cookie Bars
1. Preparing the Ingredients
Start by gathering all of your ingredients and ensuring they’re at room temperature. Softened butter is essential for easy mixing, and bringing your eggs to room temperature helps them incorporate better into the dough. Preheat your oven to 350°F (175°C), and grease a 9×13-inch baking pan or line it with parchment paper.
2. Mixing the Dough
In a large mixing bowl, combine the softened butter, brown sugar, and granulated sugar. Cream them together using an electric mixer or a hand whisk until the mixture is light and fluffy. This step helps incorporate air into the dough, making your bars light and chewy. Add the eggs one at a time, followed by the vanilla extract, and mix until fully combined.
In a separate bowl, whisk together the flour, baking powder, and salt. Gradually add the dry ingredients to the wet ingredients, mixing just until incorporated. Be careful not to overmix, as this can make the dough dense.
3. Baking the Cookie Bars
Once your dough is ready, fold in the chocolate chips or any other mix-ins of your choice. Spread the dough evenly in the prepared baking pan, making sure it reaches all corners. Bake the bars in the preheated oven for 20-25 minutes. The bars should be golden brown around the edges, and a toothpick inserted in the center should come out clean or with just a few crumbs.
4. Cooling and Cutting the Bars
Allow the bars to cool in the pan for about 10 minutes before cutting them into squares. This gives them time to set and makes cutting easier. Once they’ve cooled enough to handle, slice them into 24 squares, or adjust the size depending on how big you want your servings.
Tips for Perfecting Your Cookie Bars
To ensure that your Holiday Cookie Bars turn out perfectly, consider the following tips:
How to Customize Your Cookie Bars
Want to make your cookie bars even more special? Experiment with flavored extracts, such as almond or peppermint, to add a unique twist. You can also mix in toffee bits, marshmallows, or white chocolate chips for different flavor combinations.
Making Them More Festive
For a holiday touch, decorate your cookie bars with colored sprinkles, or drizzle them with white chocolate or royal icing for a wintry look. You can also add festive-shaped candy pieces for a fun and eye-catching decoration.
Troubleshooting Common Problems
- If the dough is too sticky, chill it in the fridge for 30 minutes before spreading it in the pan.
- If your bars end up being too dry, you may have over-baked them. Be sure to check them toward the lower end of the baking time.
- For extra chewy bars, make sure to store them properly after baking. They’ll retain moisture better if kept in an airtight container.
Why These Cookie Bars Are Ideal for Holiday Gifting
Cookie bars make wonderful holiday gifts. They’re easy to make in large batches, and they store well, meaning you can prepare them ahead of time. Wrap them in festive packaging like cellophane bags tied with a ribbon or place them in a decorative tin for a thoughtful homemade gift.
Frequently Asked Questions About Holiday Cookie Bars
Can I make these cookie bars ahead of time?
Yes! You can prepare the dough in advance and store it in the fridge for up to 2 days. Alternatively, you can freeze the dough for up to 3 months. Just thaw before baking.
Can I use different chocolate or mix-ins?
Absolutely! You can use milk chocolate, dark chocolate, or white chocolate chips. You can also add nuts, candy pieces, or dried fruit to the dough for extra flavor.
How do I store leftover cookie bars?
Store leftover cookie bars in an airtight container at room temperature for up to 5 days. If you want to keep them fresh longer, you can refrigerate them.
Can I freeze these cookie bars?
Yes, cookie bars freeze well. Wrap them tightly in plastic wrap or place them in an airtight container. They can be frozen for up to 3 months.
How can I make the bars more festive for the holidays?
Decorate with sprinkles, drizzle with chocolate, or use holiday-themed candy for a seasonal touch.
How do I know when the cookie bars are done baking?
Check for a golden brown color around the edges and use a toothpick to test doneness. If it comes out clean, the bars are ready.
Conclusion
These Holiday Cookie Bars are the perfect addition to any festive occasion. They’re easy to make, customizable, and packed with the flavors everyone loves. Whether you’re baking for a party, gifting them to loved ones, or simply enjoying them with a hot beverage, these bars will surely become a holiday staple. Get ready to enjoy the decadent goodness and share the joy with others!

")